
Welcome! This manual guides you through the Canon EOS Rebel G, a popular film camera.
It’s designed for both beginners and enthusiasts seeking a classic photographic experience.
The Canon Rebel G, also known as EOS 500N, offers reliable performance and user-friendly features.
Explore its capabilities with this comprehensive guide, ensuring optimal image quality.
Canon provides detailed instructions and support for the EOS Rebel G.
Access the PDF manual online or browse resources for enhanced understanding and enjoyment.
What is the Canon Rebel G?
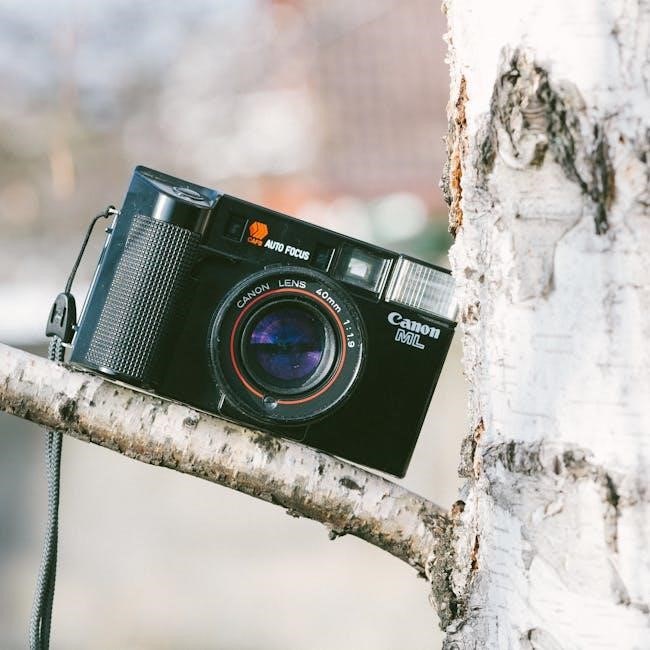
The Canon Rebel G (also marketed as EOS 500N) is a 35mm single-lens reflex (SLR) film camera produced by Canon. Released in the late 1990s, it quickly gained popularity due to its affordability and ease of use.
This camera is designed for both amateur and experienced photographers, offering a blend of automatic and manual controls. The Canon Rebel G features a user-friendly interface, making it an excellent choice for those transitioning from point-and-shoot cameras.
Detailed instructions are available in the manual.
It’s a versatile camera capable of producing high-quality images with various film types. The EOS Rebel G is a reliable and enjoyable tool for capturing memories.
Key Features and Specifications
The Canon Rebel G boasts several notable features. It utilizes Canon’s EF lens mount, offering compatibility with a wide range of lenses. It features a built-in flash with multiple modes, including auto, flash-on, and flash-off.
Key specifications include a shutter speed range of 1/1000 to 1 second, and continuous shooting at up to 1 frame per second. The camera supports film speeds of ISO 25-3200. The manual details these settings.
Its metering system offers evaluative, partial, and center-weighted average options. The EOS Rebel G is powered by two CR123A batteries.
Target Audience for this Manual
This manual is designed for anyone using a Canon EOS Rebel G (or EOS 500N) film camera. It caters to both beginners taking their first steps in photography and experienced users wanting to rediscover film.
Whether you’re a student, hobbyist, or enthusiast, this guide provides clear, concise instructions. It assumes no prior knowledge, explaining fundamental concepts alongside advanced features.
The Canon Rebel G’s user base is diverse, and this manual aims to be accessible to all, helping unlock the camera’s full potential.

Getting Started with Your Canon Rebel G
Begin by unpacking your Canon Rebel G and familiarizing yourself with its components. This section covers initial setup and understanding the camera’s layout.
Follow the instructions to properly insert the battery and prepare for your first roll of film. Let’s start your photographic journey!
Unboxing and Initial Setup
Carefully unpack your Canon Rebel G, ensuring all components are present. These typically include the camera body, a strap, and potentially some basic documentation. Before proceeding, inspect the camera for any visible damage sustained during shipping.
Next, locate the battery compartment and prepare to insert the battery. Refer to the manual for the correct orientation. Once the battery is securely in place, the camera should power on, displaying information on the LCD screen. Initial setup may involve setting the date and time, which will be covered later.
Finally, familiarize yourself with the camera’s exterior, noting the location of key controls like the shutter button, mode dial, and film advance lever. A thorough understanding of these elements will greatly enhance your shooting experience.
Understanding the Camera Body and Controls
The Canon Rebel G features a user-friendly layout. The mode dial selects shooting modes like Auto, Program, and Manual. The shutter button initiates the exposure. The film advance lever moves the film forward after each shot.
Locate the LCD screen, displaying shooting information and menu options. The directional buttons navigate menus and adjust settings. The autofocus point selection allows you to choose where the camera focuses.
Refer to your manual for detailed explanations of each control’s function. Understanding these elements is crucial for mastering your Canon and achieving desired photographic results.
Inserting and Removing the Battery
The Canon Rebel G utilizes a CR123A lithium battery for power. Locate the battery compartment, typically on the bottom of the camera body. Ensure the camera is switched off before proceeding with battery operations.
To insert, align the battery with the polarity markings (+ and -) inside the compartment and gently push it in until it clicks. To remove, press the battery release latch and the battery will pop up slightly for easy removal.
Always handle batteries with care and follow the manual’s safety guidelines. Proper battery management ensures reliable camera operation.

Basic Camera Operations
Mastering the Canon Rebel G begins with fundamental operations. This includes film loading, setting the date/time, and understanding various shooting modes for optimal results.
Follow the manual’s guidance to correctly load film and configure the camera’s settings. Explore Auto and Program modes for simplified picture-taking.
Loading Film
Proper film loading is crucial for successful photography with your Canon Rebel G. Begin by opening the film compartment, located on the camera’s back. Insert the film canister into the designated holder, ensuring it clicks into place securely.
Next, thread the film leader across the film pressure plate and into the take-up spool. Gently advance the film using the film advance lever until the film begins to wind onto the take-up spool. Close the film compartment door.
The camera will automatically rewind the film when it reaches the end of the roll. Refer to the manual for detailed diagrams and troubleshooting tips regarding film loading and rewinding techniques.
Setting the Date and Time
The Canon Rebel G, specifically models like the EOS 3000N/DATE and EOS 66/DATE, feature a date/time imprint function. To set the date and time, access the camera’s menu system using the buttons on the rear panel.
Navigate to the date/time setting option and use the control dial to adjust the year, month, day, hour, and minute. Confirm each setting by pressing the ‘Set’ button. Accurate date and time settings are essential for correctly imprinting information on your photographs.
Consult your manual for specific button configurations and menu navigation instructions.
Understanding Shooting Modes (Auto, Program, etc.)
The Canon Rebel G offers various shooting modes to suit different photographic situations. Auto mode simplifies operation, letting the camera handle all settings. Program mode (P) allows some user control, like flash settings, while the camera manages aperture and shutter speed.
Other modes include Shutter-priority (Tv) and Aperture-priority (Av), granting control over specific settings. Explore the manual to understand each mode’s functionality and when to utilize them for optimal results. Experimentation is key!
Focusing and Exposure
Mastering focus and exposure is crucial for sharp, well-lit photos with your Canon Rebel G.
The manual details autofocus modes and exposure compensation techniques.
Understand metering modes to ensure accurate exposure in diverse lighting conditions.
Practice these skills for consistently excellent results!
Autofocus Modes and Selection
The Canon Rebel G offers several autofocus (AF) modes to suit various shooting scenarios. The manual explains Single AF, ideal for stationary subjects, locking focus upon half-pressing the shutter button. Continuous AF is perfect for tracking moving objects, constantly adjusting focus as they move within the frame.
Selecting the appropriate AF mode is vital for sharp images. Consider the subject’s movement and choose accordingly. The camera’s AF point selection allows you to prioritize focus on specific areas of the frame, enhancing compositional control. Refer to your Canon guide for detailed instructions on mode selection and optimal usage.

Exposure Compensation
Exposure compensation allows you to override the camera’s automatic exposure settings on the Canon Rebel G. This is crucial when shooting scenes with unusual brightness, like snow or backlit subjects. The manual details how to adjust the exposure, making images brighter or darker as needed.
Using the +/- button, you can dial in compensation in stops. Positive values brighten the image, while negative values darken it. Mastering this feature ensures accurate exposure, preventing washed-out highlights or overly dark shadows. Consult your Canon guide for specific settings and practical examples.
Metering Modes Explained
The Canon Rebel G offers several metering modes to determine optimal exposure. Evaluative metering analyzes the entire scene for balanced exposure, ideal for general photography. Partial metering focuses on a smaller area, useful for backlit subjects. Center-weighted average metering prioritizes the center of the frame.
Your manual explains how to select these modes. Understanding each mode’s strengths allows you to tailor exposure to specific situations. Experiment with different settings to achieve desired results, ensuring properly exposed images in various lighting conditions with your Canon camera.

Advanced Features
Explore the Canon Rebel G’s advanced capabilities! Utilize flash effectively, adjust white balance, and master depth of field for creative control.
The manual details these features, enabling you to elevate your photography beyond basic settings and achieve professional-looking results.
Using Flash Effectively
The Canon Rebel G offers versatile flash options for enhancing your images. The manual details built-in flash modes, including Auto, Red-Eye Reduction, and Fill-Flash. Understanding these settings is crucial for proper illumination in various shooting conditions.
External flash units can also be connected, providing greater power and creative control. Explore the camera’s flash synchronization speed for capturing motion without blur. Proper flash usage minimizes harsh shadows and ensures well-exposed photographs, even in challenging lighting scenarios. Refer to the manual for specific guidance on flash exposure compensation.
White Balance Adjustment
The Canon Rebel G’s manual explains how to achieve accurate color rendition through white balance settings. While primarily a film camera, understanding color temperature is still beneficial for consistent results. Different film types react differently to light sources.
Though lacking digital presets, awareness of daylight, cloudy, tungsten, and fluorescent lighting helps select appropriate film. Experimentation is key! Proper white balance ensures colors appear natural and true-to-life, avoiding unwanted color casts in your photographs. Consult the manual for optimal film choices.
Understanding Depth of Field
The Canon Rebel G manual details how aperture controls depth of field – the area in focus. A wider aperture (smaller f-number like f/2;8) creates a shallow depth of field, ideal for isolating subjects with blurred backgrounds. Conversely, a narrower aperture (larger f-number like f/16) maximizes depth of field, keeping more of the scene sharp.
Factors like focal length and distance to the subject also influence depth of field. Mastering this concept allows creative control over your images, emphasizing specific elements and creating visually appealing photographs. Experiment with different settings!

Troubleshooting Common Issues
Canon Rebel G manual offers solutions for issues like film not advancing or lens errors.
Check battery, film loading, and connections for quick fixes and continued use.
Refer to the manual for detailed guidance on resolving camera malfunctions and ensuring optimal performance.
Don’t hesitate to consult Canon’s support resources.
Film Not Advancing
If your film isn’t advancing, first ensure it’s loaded correctly, following the Canon Rebel G manual’s instructions. Check the film leader is properly engaged with the take-up spool.
A common issue is a jammed film; carefully open the back and re-load, verifying smooth movement. Also, confirm the battery has sufficient charge, as low power can affect the motor. If the problem persists, consult the manual’s troubleshooting section for further guidance, or seek professional repair.
Incorrect film loading is a frequent cause, so double-check each step.
Lens Errors
Lens errors on your Canon Rebel G often display as “Err” on the LCD. First, power off the camera, then carefully remove and reattach the lens, ensuring a secure connection. Inspect the lens contacts for any dirt or damage; gently clean them with a soft cloth.
Consult the manual to verify lens compatibility. Incompatible or malfunctioning lenses will trigger this error. If the issue continues, a professional lens or camera repair may be necessary.
Avoid forcing the lens; gentle handling is crucial.
Camera Not Turning On
If your Canon Rebel G fails to power on, first check the battery compartment. Ensure the battery is correctly inserted with the proper polarity, as detailed in the manual. Try a fresh set of batteries, even if the current ones seem partially charged.
Inspect the battery contacts for corrosion or debris, cleaning them gently if needed. A faulty battery door switch can also prevent operation; ensure it’s fully engaged. If problems persist, professional repair is advised.

Maintenance and Care
Protect your investment! Regularly clean the lens and body. Proper storage and battery care, as outlined in the manual, ensure longevity.
Follow Canon’s recommendations for optimal performance and to maintain the EOS Rebel G’s functionality for years of enjoyable photography.
Cleaning the Lens
Maintaining clarity is key! Use a soft, lint-free cloth specifically designed for lenses to gently remove dust and fingerprints.
Avoid harsh chemicals or abrasive cleaners, as these can damage the lens coating.
Canon recommends using a blower to remove loose particles before wiping. For stubborn smudges, a lens cleaning solution can be applied sparingly to the cloth – never directly onto the lens.
Regular cleaning, as detailed in your manual, ensures optimal image quality and protects your EOS Rebel G’s lens for years of photographic enjoyment. Always handle with care!
Storing Your Canon Rebel G
Proper storage protects your investment! When not in use, store your Canon EOS Rebel G in a cool, dry place, away from direct sunlight and extreme temperatures.
A camera bag or case is highly recommended for protection.
Remove the battery to prevent potential corrosion. Avoid storing the camera in humid environments, which can lead to mold or damage. Refer to your manual for detailed guidance.
Long-term storage requires extra care. Ensure the lens is capped and the body is secure, preserving its functionality for future photographic adventures!
Battery Care and Replacement
Maximize battery life! The Canon Rebel G utilizes a CR123A lithium battery. Remove the battery when the camera isn’t in use for extended periods to prevent leakage and corrosion.
Avoid extreme temperatures, as they can reduce battery performance. When replacing, use only Canon-approved or high-quality compatible batteries. Consult your manual for correct installation.
Dispose of used batteries responsibly, following local regulations. Regularly check the battery compartment for any signs of corrosion and clean as needed, ensuring optimal camera operation.
Accessories for the Canon Rebel G
Enhance your photography! Explore Canon-compatible lenses, filters, and remote controls for the Rebel G;
These accessories expand creative possibilities and improve image quality.
The manual details available options, including recommended filters for various effects. Consider a remote control for stable, distant shooting.
Compatible Lenses
The Canon Rebel G utilizes the Canon EF lens mount, offering a vast selection of compatible lenses. This system provides flexibility for various photographic styles and budgets. The manual details lens compatibility, ensuring optimal performance and image quality.
EF lenses range from wide-angle to telephoto, including zoom and prime options. Consider lenses with image stabilization (IS) for sharper handheld shots; Explore third-party lens options, but verify compatibility before purchase. Canon’s extensive lens lineup allows photographers to tailor their equipment to specific needs, enhancing creative control and photographic results.
Recommended Filters
Enhance your Canon Rebel G photography with filters! A UV filter protects the lens from scratches and dust. A polarizing filter reduces glare and deepens colors, ideal for landscapes. The manual suggests filters to improve image quality.
Neutral Density (ND) filters allow for wider apertures in bright light, creating shallow depth of field. Color filters can create special effects. Experiment with filters to unlock creative possibilities. Canon accessories, including filters, complement the Rebel G’s capabilities, expanding your artistic vision.
Optional Remote Controls
Enhance your shooting experience with a remote control! These accessories allow for hands-free operation, minimizing camera shake during long exposures or self-portraits. The Canon Rebel G manual details compatible options for convenient control.
Remote controls offer precise timing and eliminate physical contact, crucial for macro photography or wildlife shots. Explore wired or wireless remotes to suit your needs. Canon provides reliable remote solutions, expanding the EOS Rebel G’s versatility and creative potential.
Understanding the LCD Screen and Menus
Navigate settings easily! The Canon Rebel G’s LCD displays crucial information and allows menu access.
The manual explains interpreting displays and customizing camera functions effectively.
Explore the menu system to adjust settings like date, time, and image quality.
Mastering the LCD and menus unlocks the full potential of your EOS Rebel G.
Navigating the Menu System
Accessing the menu on your Canon Rebel G is straightforward. Press the ‘MENU’ button to reveal a series of options displayed on the LCD screen. Use the directional buttons – up, down, left, and right – to scroll through the various menu categories.
These categories include settings for film advance, print quality, date/time, and custom functions. To select a specific option, highlight it with the directional buttons and press the ‘SET’ button. The manual provides a detailed breakdown of each menu item, explaining its function and available settings. Remember to consult the PDF manual for visual aids and clarification.
Understanding the menu structure is key to customizing your camera and achieving desired results; Experiment with different settings to explore the EOS Rebel G’s capabilities.
Interpreting LCD Display Information
The Canon Rebel G’s LCD screen provides crucial shooting information. Key indicators include the frame counter, displaying the number of shots taken on the current film roll. You’ll also see the selected shooting mode – Auto, Program, or Manual – and the autofocus status.
The display shows the exposure compensation setting, if adjusted, and the battery level. When reviewing images, the LCD presents basic shooting data; Refer to your manual, specifically the PDF manual, for a complete explanation of all icons and symbols. Understanding these displays enhances your control over the EOS Rebel G.
Customizing Camera Settings
The Canon Rebel G allows limited customization through its menu system. While not extensive like digital cameras, you can adjust settings like the digital date imprint on photos. Access these options by navigating the menu using the camera’s buttons, as detailed in the manual.
Explore options for beep sounds and display settings. Remember to consult the PDF manual for specific instructions. These adjustments personalize your shooting experience. Though fewer than modern cameras, these settings offer control over the EOS Rebel G’s operation.

Film Types and Recommendations
The Canon Rebel G is compatible with 35mm film. Choose the right film speed (ISO) for your lighting conditions, as outlined in the manual.
Experiment with different film types—color negative, slide, or black and white—to achieve varied aesthetic results. Refer to the PDF for guidance!
Choosing the Right Film for Your Needs
Selecting film for your Canon Rebel G depends on your photographic goals. Color negative film is versatile and forgiving, ideal for general use and prints.
Slide film (transparency) offers vibrant colors and high contrast, best suited for projection or scanning. Black and white film provides classic tones and artistic expression.
Consider the film’s ISO (sensitivity) – lower ISOs (e.g., 100) for bright light, higher ISOs (e.g., 400, 800) for low light. The manual details compatibility and optimal settings. Experiment to discover your preferred look!
Film Speed and ISO Settings
ISO represents film sensitivity to light; lower numbers (50, 100) mean less sensitivity, requiring more light for proper exposure. Higher numbers (400, 800, 1600) are for low-light situations.
The Canon Rebel G allows you to set the ISO manually, matching it to the film loaded. Accurate ISO setting is crucial for correct exposure. Refer to your film packaging for its ISO value.
Incorrect settings lead to over or underexposed images. The manual explains how to adjust the ISO via the camera’s controls, ensuring optimal results in various lighting conditions.
Film Loading and Rewinding Techniques
Loading film into the Canon Rebel G requires careful attention. Open the back cover, insert the film canister, and thread the film leader to the take-up spool. Advance the film a couple of times before closing the back.
Rewinding is equally important. After shooting, use the rewind crank to safely retract the film back into the canister. The manual details the precise steps for both processes.
Incorrect loading or rewinding can damage the film or camera. Practice these techniques to avoid issues and preserve your precious memories.