
Suntuf Installation Guide: A Comprehensive Plan
Planning a successful Suntuf roof requires careful attention to detail, from initial measurements and purlin spacing to proper screw placement and UV protection considerations.
This guide provides instructions for common Suntuf panel applications, emphasizing safety and ensuring a durable, weather-resistant roofing solution for DIY enthusiasts.
Remember to always install with the UV protected side facing outwards, avoiding over-tightening screws, and never stepping directly on the panels during installation.
Suntuf polycarbonate panels represent a lightweight, durable, and cost-effective roofing and siding solution, widely favored for DIY projects and various applications. These corrugated panels offer excellent light transmission while providing robust protection from the elements.

Suntuf is known for its ease of installation, making it accessible to homeowners and contractors alike. Its inherent properties, including UV protection and impact resistance, contribute to a long-lasting and low-maintenance roofing system.
This guide will navigate you through the entire installation process, ensuring a secure and aesthetically pleasing result, referencing best practices and safety guidelines for optimal performance.
Safety Precautions
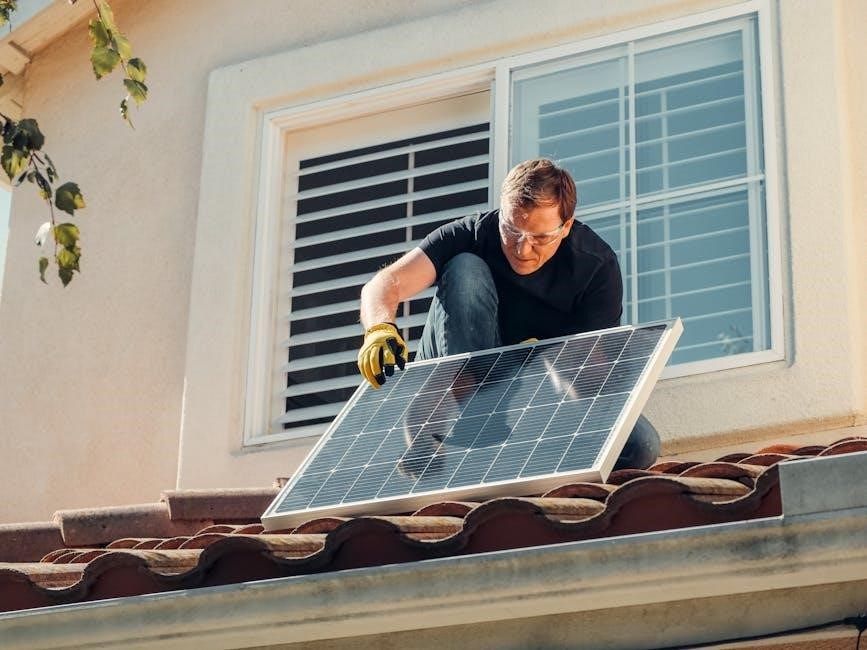
Prioritizing safety during Suntuf panel installation is paramount. Always wear appropriate personal protective equipment (PPE), including safety glasses, gloves, and a hard hat, to prevent injuries from falling debris or sharp edges.

Never work alone and ensure a spotter is present, especially when working at heights. Do not step directly on the Suntuf panels, as they can become slippery and may not support your weight, leading to falls.
Exercise caution when using power tools and follow manufacturer’s instructions diligently. Secure ladders properly and maintain a safe working environment free from obstructions.
Tools and Materials Required
For a successful Suntuf installation, gather essential tools: a measuring tape, pencil, square, and appropriate cutting tools like a circular saw or fine-tooth hand saw. You’ll also need a drill with screw bits, noise reduction tape, and suitable screws with neoprene washers.
Materials include Suntuf polycarbonate panels, purlins (wood or metal), and potentially flashing for watertight seals. Ensure screws are corrosion-resistant and compatible with both the panels and purlin material.
Having these readily available streamlines the process and ensures a professional finish.
Measuring and Planning

Precise measuring is crucial before starting your Suntuf installation. Begin by accurately measuring the roof’s length and width, noting any angles or obstructions. Careful planning involves determining the optimal sheet layout to minimize waste and ensure proper overlap.
Consider the roof’s pitch and calculate appropriate purlin spacing for adequate support. This initial step dictates the entire project’s success, influencing material quantities and installation efficiency.
Sketching a layout beforehand is highly recommended.
Accurate Roof Measurements
Obtaining accurate roof measurements is the foundation of a successful Suntuf installation. Measure the length and width of the roofing area, accounting for any overhangs or unique features. Double-check all dimensions to minimize errors and material waste.
Note the roof’s pitch; this impacts sheet overlap and purlin spacing calculations. Precise measurements ensure a snug fit, preventing leaks and maximizing the roof’s protective capabilities.
Detailed sketches with labeled dimensions are invaluable during this stage.

Determining Sheet Layout
Carefully plan the Suntuf sheet layout to minimize waste and ensure a visually appealing result. Consider the panel’s width and the roof’s dimensions to determine the optimal number of sheets needed per row.

Plan for appropriate side and end overlaps, typically one corrugation, to maintain weather tightness. A well-thought-out layout reduces cutting and simplifies the installation process, saving time and effort.
Sketching the layout beforehand is highly recommended.
Understanding Suntuf Panel Orientation
Correct Suntuf panel orientation is crucial for longevity and performance. Always install the panels with the UV-protected side facing outwards, exposed to sunlight. This side is typically marked with a protective film or label.
Failing to orient the panels correctly will lead to premature degradation from UV exposure, reducing the roof’s lifespan and compromising its structural integrity. Proper orientation maximizes the panel’s resistance to weathering.
Double-check before securing each sheet!
UV Protection Side Identification
Identifying the UV-protected side of Suntuf panels is paramount for a successful installation. Typically, this side features a labeled protective film or a clear indication directly on the panel’s surface.
Carefully inspect each sheet before commencing installation; the UV-protected layer shields against harmful sun rays, preventing discoloration and maintaining the panel’s structural integrity over time.
Always ensure this side faces outwards, guaranteeing maximum protection and extending the roof’s lifespan.
Correct Panel Positioning
Proper panel positioning is crucial for a secure and watertight Suntuf roof. Begin installation at the lower (gutter) purlin, aligning the first sheet carefully with the structure’s edge.
Work outwards, ensuring each subsequent sheet overlaps correctly, typically following manufacturer’s guidelines for optimal weather resistance.
Maintain consistent alignment throughout the process, and always screw from the outside (barge side) towards the center, securing the panel firmly to the purlins.
Purlin Preparation and Spacing
Purlin spacing is vital for Suntuf panel support; optimal distances depend on load requirements and local building codes. Ensure purlins are level and securely fastened to the roof structure.
Consider the material of your purlins – wood or metal – and choose appropriate fasteners. Accurate measurements and consistent spacing are key to preventing sagging or panel distortion.

Properly prepared and spaced purlins provide a stable foundation for a long-lasting and reliable Suntuf roofing system.
Optimal Purlin Spacing for Support
Optimal purlin spacing for Suntuf panels typically ranges between 24 to 32 inches, but this varies based on snow load, wind exposure, and panel thickness. Closer spacing provides greater support.
Consult local building codes for specific requirements in your area. Insufficient spacing can lead to panel deflection or failure, especially under heavy loads. Prioritize structural integrity.
Carefully assess your roof’s needs to determine the most appropriate purlin spacing for a secure and durable Suntuf installation, ensuring long-term performance.
Purlin Material Considerations
Purlin materials should be chosen for strength, durability, and compatibility with Suntuf panels. Wood purlins are common, but must be pressure-treated to resist rot and insect damage.
Metal purlins, like steel or aluminum, offer superior strength and longevity, especially in harsh climates. Ensure any metal used is corrosion-resistant.
Properly sized and installed purlins are crucial for supporting the Suntuf sheets and withstanding environmental stresses, guaranteeing a stable roofing system.
Installing Noise Reduction Tape
Installing noise reduction tape significantly minimizes sound transmission through the Suntuf roofing, particularly during rain or hail. Apply the tape to the underside of the Suntuf sheets, along the purlin contact points.
This creates a cushioning effect, dampening vibrations and reducing noise levels. Tape application locations are critical; ensure full coverage where the panel rests on the purlin.
The benefits extend beyond noise reduction, also minimizing thermal expansion and contraction sounds, contributing to a quieter and more comfortable environment.
Tape Application Locations
Tape should be applied to the underside of each Suntuf panel, specifically at all points of contact with the supporting purlins. Focus on areas where the sheet directly rests upon the purlin structure.
Ensure complete coverage along the entire length of each purlin contact point, preventing any direct sheet-to-purlin contact. This maximizes the noise and vibration dampening effect.
Strategic placement is key; consistent application across all purlin intersections guarantees optimal performance and a quieter roofing system.
Benefits of Noise Reduction
Noise reduction tape significantly minimizes the transmission of external sounds, like rain or hail, through the Suntuf roofing system, creating a more peaceful indoor environment.
It effectively dampens vibrations caused by wind or impacts, reducing echoing and reverberation within the structure. This is particularly beneficial in metal buildings.
The tape enhances overall comfort and usability of spaces beneath the roof, offering a quieter and more pleasant atmosphere for occupants;
Cutting Suntuf Panels
Cutting Suntuf panels requires precision to maintain structural integrity and weather resistance; Utilize fine-toothed circular saws or specialized cutters designed for polycarbonate sheeting.
Employing the correct tools ensures clean, burr-free cuts, preventing stress cracks and potential failure points. Support the panel adequately during cutting to avoid vibrations.
Always measure twice and cut once, accounting for overlaps and desired panel positioning. Proper cutting techniques are crucial for a professional and long-lasting installation.
Recommended Cutting Tools
For efficient and clean Suntuf panel cutting, a fine-toothed circular saw is highly recommended, utilizing a blade specifically designed for plastics or polycarbonate materials.
Alternatively, specialized cutters made for corrugated roofing sheets offer precise cuts with minimal chipping or cracking. Ensure the blade is sharp and in good working condition.
Avoid using abrasive tools, as they can generate excessive heat and damage the panel. Safety glasses are essential when operating any cutting equipment.
Techniques for Clean Cuts
To achieve professional-looking, clean cuts on Suntuf panels, maintain a slow and steady cutting speed, allowing the blade to properly navigate the material without causing splintering.
Support the panel firmly during the cutting process to minimize vibrations and ensure a straight line. Consider clamping the sheet to a stable surface for added control.
A smooth, continuous cut is preferable; avoid stopping and starting mid-cut. Deburr any sharp edges with a file or sandpaper for a polished finish.
Panel Installation ౼ First Sheet
Begin installing the first Suntuf sheet by carefully aligning it with the structure, ensuring it’s square and level. Start screwing along the lower purlin, working from the outside (barge side) towards the center.
This initial alignment is crucial for subsequent sheets. Maintain consistent spacing between screws, and avoid over-tightening, which can damage the panel. Proper starting point ensures a secure and aesthetically pleasing roof.
Double-check alignment before fully securing the sheet, guaranteeing a smooth installation process.
Starting Point and Alignment
Selecting the correct starting point is vital for a professional Suntuf roof. Begin at the lower edge, typically the gutter line, ensuring the first sheet is perfectly square to the building’s frame.
Precise alignment prevents cumulative errors as you install subsequent sheets. Use a level to verify both horizontal and vertical alignment before securing the panel with screws.
A properly aligned first sheet establishes the foundation for a straight, durable, and visually appealing finished roof, minimizing potential issues later in the process.
Screw Placement – Lower Purlin
When securing the first Suntuf sheet to the lower purlin, begin screwing from the outside, moving towards the structure’s center – the barge side.
This technique ensures proper panel alignment and prevents buckling during installation. Use appropriate screws designed for polycarbonate roofing, and pre-drill holes if necessary.
Maintain consistent spacing along the purlin, following manufacturer recommendations, to distribute the load evenly and create a secure, weather-tight connection.
Securing Subsequent Sheets
To secure subsequent Suntuf sheets, overlap them according to the manufacturer’s guidelines, ensuring a watertight seal. Screw through the overlap into the underlying sheet and purlin.
Maintain consistent screw spacing along each purlin for uniform support and to prevent stress concentrations.
Always use the correct screw type and avoid over-tightening, which can damage the polycarbonate. Proper overlap and secure fastening are crucial for long-term performance.
Overlap Guidelines
Suntuf sheets require a specific overlap to ensure weather resistance and structural integrity. Generally, a minimum overlap of one corrugation is recommended, allowing for thermal expansion and contraction.
Ensure the overlap direction allows water to flow over the upper sheet, preventing ingress. Consistent overlap is vital across the entire roof surface.
Refer to the manufacturer’s specifications for precise overlap distances, as they may vary based on roof pitch and wind load considerations.
Screw Placement – Subsequent Purlins
When securing Suntuf sheets to subsequent purlins, maintain consistent spacing for optimal support and weatherproofing. Typically, screws are placed in every second or third corrugation along the purlin length.
Stagger screw placement between purlins to distribute stress evenly across the sheet. Ensure screws penetrate the purlin sufficiently for a secure hold, but avoid over-tightening.
Proper screw placement prevents sheet distortion and maintains the integrity of the roofing system, especially under wind or snow loads.
Screw Installation Best Practices
Suntuf installation demands careful screw application for longevity. Always ensure the screw is installed perpendicularly to the sheet, preventing damage and maintaining a watertight seal.
Critically, avoid over-tightening screws, as this can crush the polycarbonate, leading to stress cracking and potential leaks. Use a drill with adjustable clutch settings.
Pre-drilling pilot holes is recommended, especially with metal purlins, to ease installation and prevent sheet distortion. Consistent, correct screw installation is key.
Perpendicular Screw Angle
Maintaining a 90-degree angle when installing screws is paramount for a secure and weatherproof Suntuf roof. A perpendicular angle ensures the screw engages fully with the purlin, maximizing holding power.
Angled screws reduce the clamping force, potentially leading to water ingress and panel movement, especially under wind or snow loads. Use a drill guide if needed.
Consistent perpendicularity prevents stress on the polycarbonate sheet, minimizing the risk of cracking and ensuring long-term structural integrity of the installed roofing system.
Avoiding Over-Tightening
Over-tightening screws during Suntuf panel installation is a common mistake that can compromise the roofing system’s integrity. Excessive force can crush the polycarbonate, deforming the sheet around the screw head.
This deformation reduces the sealing capability, creating potential leak points and increasing stress, leading to cracking. Tighten screws until snug, but avoid applying excessive pressure.
Properly installed screws create a watertight seal without damaging the panel, ensuring a durable and long-lasting roofing solution.
Addressing Snow Load Considerations
Suntuf roofing can withstand significant snow loads, but proper installation is crucial for optimal performance. Adequate purlin spacing and secure screw placement are essential to distribute weight evenly.
Consult local building codes for specific snow load requirements in your area and adjust purlin spacing accordingly. Ensure screws are correctly installed and tightened to prevent panel slippage.
Reinforced support may be necessary in regions with heavy snowfall to maintain structural integrity and prevent potential damage to the roofing system.
Dealing with UV Exposure
Suntuf panels are manufactured with UV protection, but correct installation is vital to maintain this benefit. Always ensure the UV-protected side faces outwards, exposed to sunlight, during the installation process.
This protective layer shields the panel from degradation caused by ultraviolet radiation, extending its lifespan and preserving its structural integrity. Incorrect orientation compromises UV resistance.
Regular inspection can identify any signs of UV damage, allowing for timely repairs or replacements, ensuring long-term performance and protection against the elements.
Handling Panel Edges and Finishing
Properly handling panel edges during Suntuf installation prevents damage and ensures a clean, professional finish; Avoid dropping or sharply bending the panels, as this can compromise their structural integrity.
Consider using end caps or edge flashing to seal exposed edges, protecting them from the elements and preventing water ingress; These finishing touches enhance the roof’s durability.
Careful attention to detail during the finishing stage contributes to a long-lasting, aesthetically pleasing roofing solution, maximizing the benefits of your Suntuf investment.
Troubleshooting Common Installation Issues
During Suntuf installation, issues like incorrect overlap or screw placement can occur. Ensure proper overlap according to guidelines to prevent leaks, and verify screws are perpendicular, avoiding over-tightening.
If panels aren’t aligning, re-check purlin spacing and panel orientation. Addressing these problems promptly prevents larger issues. Remember safety first – do not step on panels!
Consult the installation guide for specific solutions, and consider seeking professional help for complex problems, ensuring a secure and long-lasting roofing system.
Suntuf Maintenance and Care
Regular Suntuf roof maintenance ensures longevity and optimal performance. Periodically inspect panels for damage, checking for cracks or discoloration, especially after severe weather events.
Clean the surface with mild soap and water to remove debris, avoiding abrasive cleaners that could scratch the UV protection layer. Ensure screws remain secure, re-tightening if needed.
Proper care extends the lifespan of your Suntuf roof, maintaining its structural integrity and aesthetic appeal for years to come, providing lasting protection.